Dreamy DIY Wall Art: Easy Projects to Elevate Your Space
Make your own chic artwork with textured canvas designs, pressed flowers, and modern tapestry techniques.
Dreamy Decor | Steph B
3/6/20254 min read

If you’re anything like me, you’re always on the lookout for ways to sprinkle a little personality into your home without breaking the bank—or your sanity. I’m so excited to share some DIY wall art ideas that vibe perfectly with current trends, a range of budgets, and that oh-so-satisfying hands-on creative buzz. No matter your style, there’s something here for you. Today, we’re diving into three approachable projects—textured canvas designs, pressed flower art, and modern tapestry techniques—that’ll elevate your space and have your guests asking, “Wait, you made that?” Let’s get crafting!
Why DIY Wall Art?
Before we jump in, let’s chat about why DIY wall art is such a game-changer. First off, it’s personal—your space should tell your story, not just echo the latest catalog. Plus, it’s budget-friendly. You don’t need to splurge at to get that curated look. And honestly? There’s something magical about creating with your hands. It’s like a mini therapy session with a gorgeous payoff. These projects tie into current trends—think organic textures, nature-inspired elements, and bold, statement-making pieces. Ready to transform your walls? Let’s do this!
Project 1: Textured Canvas Designs
Textured canvas art is having a major moment—it’s modern, tactile, and surprisingly simple to pull off. Here’s how to make your own.
What You’ll Need:
A blank canvas (grab one from Amazon or Home Depot—starting at $5!)
Acrylic paint in your favorite shades (I’m loving earthy tones like sage, terracotta, and mustard right now)
Plaster or spackling paste (Home Depot and Amazon have affordable options)
A palette knife or old credit card
Optional: metallic paint or gold leaf for a luxe touch
Steps:
Prep Your Base: Start with a blank canvas—any size works, but 16x20 is a sweet spot for beginners. Pick a base color that matches your room (or go wild with something unexpected—consider moody teal or cherry red).
Mix It Up: Stir a dollop of plaster into your acrylic paint (about 1:3 ratio). This gives it that chunky, sculptural texture. Don’t overthink it—just mix until it feels thick but spreadable.
Get Texturing: Use your palette knife to smear the mixture onto the canvas. Swirl it, scrape it, make waves—whatever feels right. Create abstract ridges or circular patterns for a modern twist.
Layer It On: Let it dry (grab a cup of tea or coffee), then add a second color or a metallic accent. A swipe of gold along the edges? Yes, please.
Hang & Admire: Pop it on your wall—maybe above a reading nook or as part of an gallery wall. Instant chic.
Budget Tip: Skip the fancy supplies and raid your garage for leftover paint or spackle. This can be a $10 or less project if you play it smart!
Trend Tie-In: Textured art screams 2025’s love for organic, handcrafted vibes. Pair it with a thrifted frame for sustainability.
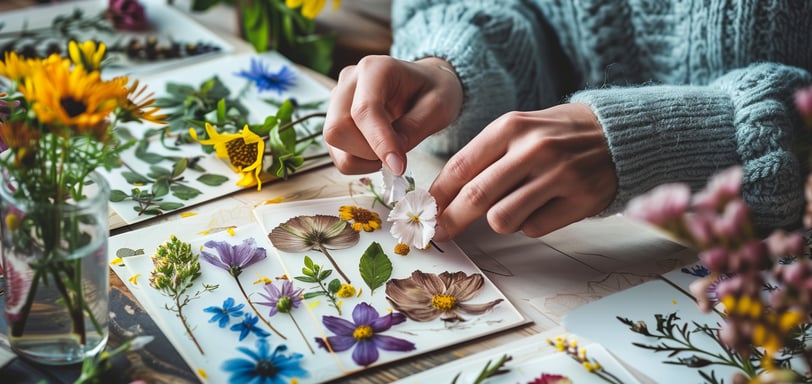
Project 2: Pressed Flower Art
Next up, let’s channel some botanical bliss with some pressed flower magic. This one’s perfect if you’re craving a nature-inspired moment. It’s also a great way to preserve memories (that roadside wildflower haul? Immortalize it!).
What You’ll Need:
Fresh or dried flowers/leaves (forage your yard or snag some from a local farmer’s market)
Heavy books or a flower press (Amazon has cute ones for under $15)
Cardstock or watercolor paper
Glue (mod podge works wonders)
A frame (Crate & Barrel has sleek options, or revive a thrift store find)
Steps:
Press Your Blooms: Pick flowers with flat-ish petals—daisies, pansies, or ferns are fab. Sandwich them between parchment paper inside a heavy book. Stack more books on top and wait 1-2 weeks. (Impatient? Microwave them between paper towels in 20-second bursts.)
Plan Your Layout: Once dry, arrange your flowers on the cardstock. Play with asymmetry or a minimalist grid.
Stick It Down: Dab glue on the back of each piece and press gently onto the paper. Let it dry fully (no rushing this one!).
Frame It Up: Slide it into a frame—glass keeps it protected and polished. A thin gold frame screams Anthropologie, while a rustic wood one nods to farmhouse decor.
Display: Hang it in a sunny spot or lean it on a shelf with some whimsical animal figurines for extra charm.
Budget Tip: Skip the frame and use washi tape to mount it directly on the wall for a playful, renter-friendly look.
Trend Tie-In: Nature-inspired decor is huge right now—think biophilic design meets vintage charm. This fits perfectly with oudoor-indoor fusion.
Project 3: Modern Tapestry Techniques
Okay, let’s get bold with a modern tapestry. This isn’t your grandma’s wall hanging (unless she’s super cool). We’re talking graphic patterns, unexpected materials, and a vibe that could headline a lookbook.
What You’ll Need:
Yarn in various colors/textures (Etsy has gorgeous hand-dyed options)
A wooden dowel or branch (forage it or grab from Home Depot)
A simple loom (optional—Target has mini ones, or just use cardboard)
Scissors and a hot glue gun
Steps:
Set Your Base: Tie your dowel or branch to a piece of cardboard with notches cut along the top and bottom (Google “DIY cardboard loom” if you’re new to this). Thread yarn vertically between the notches—this is your warp.
Weave It: Pick a chunky yarn and start weaving it horizontally over and under the warp threads. Switch colors or textures every few rows for that modern, artsy feel. I’m loving mustard yellow with pops of blush pink.
Add Flair: Toss in some fringe by knotting extra yarn along the bottom. Or glue on beads, feathers, or even dried flowers for a maximalist punch.
Finish It: Tie off the ends, cut the warp threads off the loom, and knot them around the dowel. Hang it with a piece of yarn or leather cord.
Show It Off: This baby deserves a statement wall—consider creating one in your main living space or entryway to wow guests.
Budget Tip: Use yarn scraps or repurpose old fabric strips—sustainability for the win!
Trend Tie-In: Tapestries are back, but with a fresh twist—think bold geometrics and mixed media. It’s the perfect marriage of artisan craft and current decor obsessions.
Bringing It All Together
So, there you have it—three dreamy DIY wall art projects to make your space sing! Whether you’re whipping up a textured canvas for under $20, framing pressed flowers for a botanical escape, or weaving a tapestry that screams “I’m an artist,” these ideas are all about creativity on your terms. Now, grab your supplies and let’s make some magic happen. Happy crafting!